
TM 1-1500-204-23-11
1
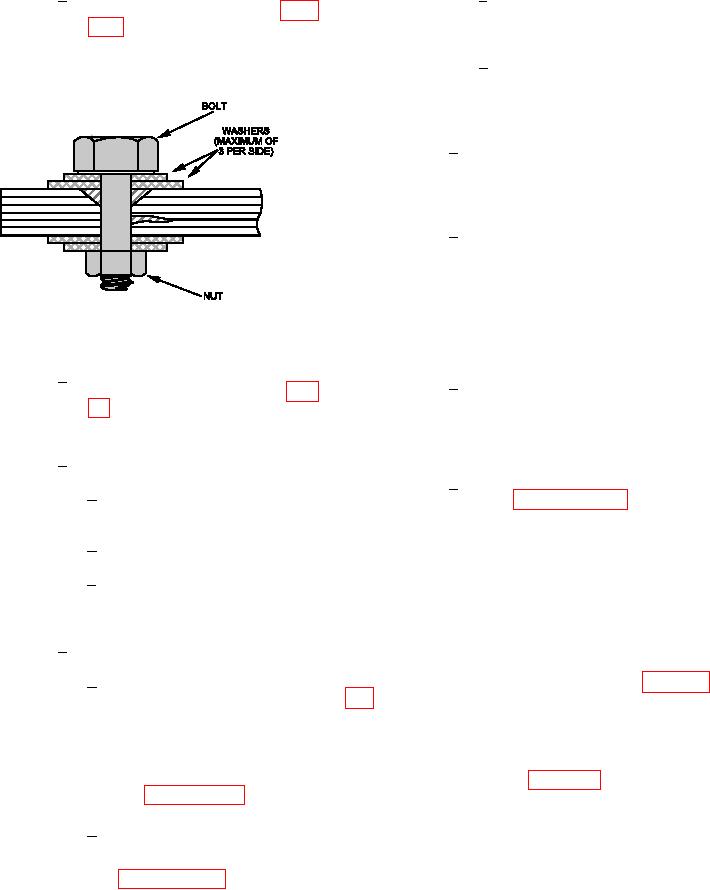
Install release agent coated bolt,
c
Cure the adhesive as speciied
washers and nut as shown in igure
in the system speciic technical
7-60. Remove any adhesive from
manual.
bolt threads with clean, dry, wiping
cloth prior to installing nut.
After the adhesive has cured,
d
debag.
(k) Clean Up/Redrill Hole If Required.
Lightly sand any residual adhesive
1
left on part surfaces using 180 grit
abrasive paper. Vacuum sanding
residue from part surface.
Visually inspect fastener hole for
2
residual adhesive. Redrill hole if
required.
(l)
Inspect repaired fastener hole to verify
delamination was successfully injected.
Figure 7-60. Application of Clamp-Up Pressure
(m) Reinish.
2
Torque the nut and bolt to the appli-
1
Sand the area smooth with 180
cable torque value listed in table
grit abrasive paper. Vacuum the
7-5 using a torque wrench to obtain
sanding dust from the repair area.
the required clamp-up pressure.
Wipe with clean, dry wiping cloth to
remove sanding residue.
Room Temperature Cure Cycle.
3
Apply inish system in accordance
2
a
Allow to dwell with nut and bolt
with paragraph 7-13b or the sys-
in place for 8 hours.
tem speciic technical manual. Use
care not to apply inish system in
Remove bolt, nut and washer.
b
fastener hole or countersink area.
Allow to dwell at room
c
g. Swagged Grommet Repair. This repair is appli-
temperature for a minimum of
cable to damaged, misdrilled or elongated fastener
5 days.
holes in advanced composite panels such as remov-
able access covers. This repair is limited to a maxi-
Elevated Temperature Cure Cycle.
4
mum cleaned up damage of 0.030 inch on the hole
radius. Damage which exceeds this limit may be
Allow to dwell with nut and
a
repaired using the method provided in paragraph
bolt in place for 8 hours. As an
7-10h. This repair procedure is not necessarily appli-
alternate, the adhesive/iller
cable to a particular weapon system. The applicability
may be set using a heat lamp.
of this repair depends upon additional factors such as
Use the cure cycle from the
loading conditions and laminate thickness. Consult the
system speciic technical
system speciic technical manual or engineering for
manual. Operate heat lamps
further guidance. Refer to igure 7-61 for the Process
per paragraph 6-19h.
Flow Diagram for Fastener Hole Repair: Swagged
Grommet.
Remove bolt, nut and washer.
b
Layup the vacuum bag and
heat blanket as described in