
TM 1-1500-204-23-11
present, irst repair the delaminations
and lines marked on the part as
per paragraph 7-10f.
shown in igure 7-47, using a per-
manent ink marking pen. Ensure
the reference points are far enough
away from the fastener hole to not
be affected by the repair process.
DO NOT use oil or oil based materials
as NDI couplants on advanced composite
Transfer the hole centerline and
2
components. Use only water or water based
the reference points to a piece of
materials. Disbonds may result and loss of
Mylar. Use this Mylar as a guide in
structural integrity may occur.
redrilling the fastener hole follow-
ing illing.
(c) Remove NDI couplant by wiping with
clean, water moistened wiping cloth.
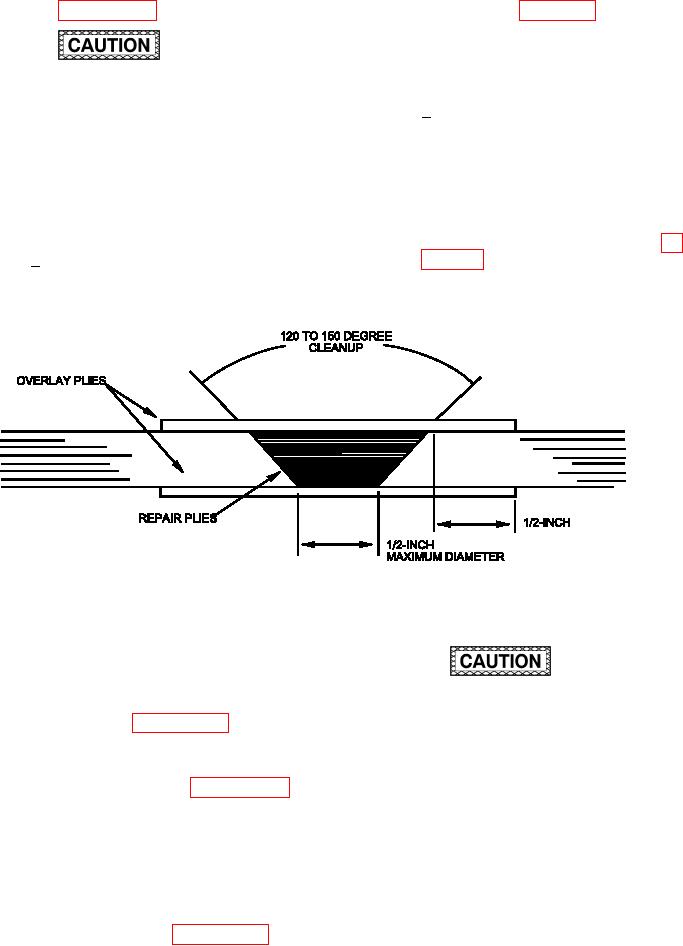
(e) Taper sand the entrance side of the fas-
tener hole, typically 120 to 150 degrees
(d) Fabricate Mylar Template.
C/L of the fastener hole, as shown in ig-
1
ure 7-57. Vacuum the area to remove
Establish the centerline of the fas-
sanding residue.
tener hole using reference points
Figure 7-57. Fabric Layup Fastener Hole Repair
(f)
Lightly abrade the surface area around
the entrance and exit sides of the fas-
tener hole with 180-grit sandpaper.
Abrade 1 inch beyond the cleanup area.
Reduced strength will result if the incorrect
Vacuum the area to remove sanding
mix ratio is used, if an excessive amount
residue. See paragraph 6-3 for paint
of air is introduced into the adhesive during
removal steps.
mixing, or if mixing is inadequate and may
result in loss of structural integrity.
(g) Dry the repair area to remove subsur-
face moisture using per paragraph 6-6.
Pressure must be applied to adhesive within
the pot life of the resin. For ambient temper-
(h) Clean fastener hole and countersink
atures in excess of 90 F, decrease this time
area using a cotton tipped applicator,
by 50%. An unsatisfactory repair will result
wiping cloth and solvent. Thoroughly
if the resin gels before adequate pressure is
clean the area with repeated wiping until
applied and may result in loss of structural
no residue is left on the cotton tipped
integrity. Select a heat blanket (if required)
applicator or the wiping cloth. Allow
the solvent to evaporate for a minimum
of 30 minutes. See paragraph 6-7 for
surface preparation steps.