TM 1-1500-204-23-11
(k) Cure repair
Apply inish system in accordance
2
with paragraph 7-13b or the sys-
tem speciic technical manual. Use
1
Apply release ilm, metal caul
care not to apply inish system in
plates and contact pressure over
fastener hole or countersink area.
the repair area using either an
external weight, clamps or a vac-
uum bag. These plates should
e. Fabric Layup Repair. This repair is applicable
extend 1 to 2 inches beyond the
to repair damaged fastener holes when the surrounding
repair area and will ensure even
laminate is delaminated and/or damaged in other ways.
pressure is applied to the repair.
This repair procedure is not necessarily applicable to
a particular weapon system. The applicability of this
repair depends upon additional factors such as loading
Cure the repair using the cure cycle
2
conditions and laminate thickness. Consult the system
from the system speciic techni-
speciic technical manual or engineering for further
cal manual and paragraph 6-19.
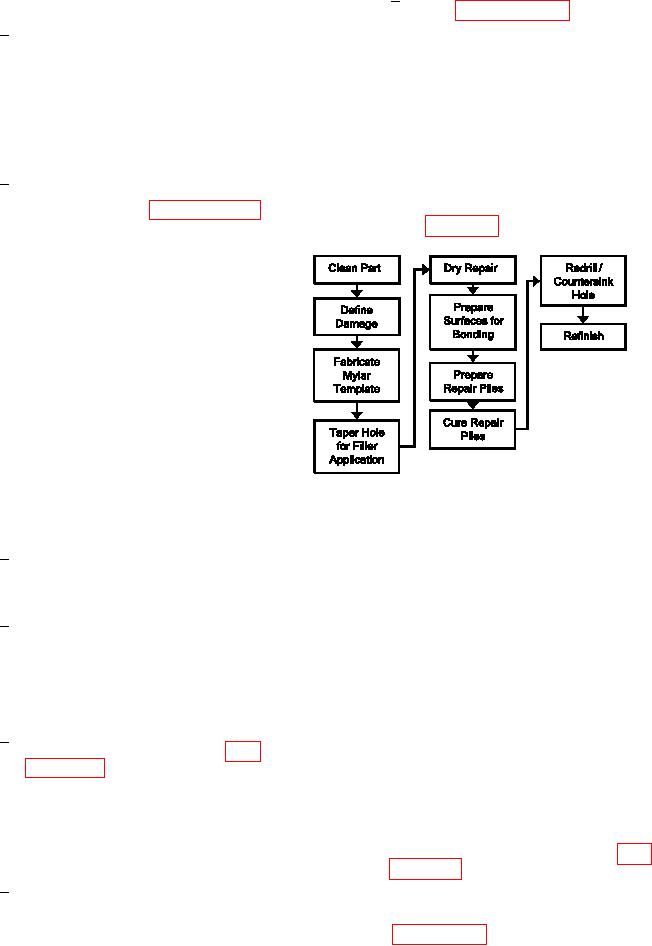
guidance. Refer to igure 7-56 for the Process Flow
If an elevated temperature cure is
Diagram for Fabric Layup Fastener Hole Repair.
required, use a heat lamp, heat
blanket or other heating equipment.
Place a thermocouple next to the
repair on the same side as the heat
source. If room temperature cure
is used, remove release ilm, caul
plate and contact pressure after a
minimum of 8 hours. Allow to dwell
at room temperature for a minimum
of 5 days.
(l)
Redrill/Countersink Hole.
NOTE
If the resin is cured at room temperature, do
NOT smooth or drill the hole for at least 24
Figure 7-56. Process Flow Diagram Fabric Layup
hours after the resin sets.
Repair
1
Lightly sand any squeezed out iller
(1) Facilities, Equipment and Materials. The
lush with part surface using 180
following equipment and materials are required: Vac-
grit abrasive paper.
uum Cleaner, HEPA Filter, Marking Pen, Weights, Shot
Bags, Clamps, Drill Motor, 2000 RPM, Drill Guide,
Using the template fabricated
2
Drill Bit, 90 Degree Router Motor, 20,000 RPM, Sand-
above, carefully locate a drill guide
ing Disks, 80 Grit, 1.0 Inch Diameter, Sanding Disk
containing the correct drill bushing
Holder, Countersink Cutter, Piloted, Microstop Cage,
for the hole to be redrilled. Secure
Silicon Carbide Abrasive Paper, Wiping Cloth, Spat-
the drill guide to the part with a
ula, Adhesive, Liquid (See System Speciic Technical
clamp.
Manual), Vacuum Bag Repair Materials Kit, Fabric
(See System Speciic Technical Manual), Aluminum
Redrill and countersink the
3
Sheet Stock, 0.063 inches or thicker (Local Pro-
repaired fastener hole per para-
curement), Cotton Tipped Applicator, Solvent, Flash
graph 6-8. If countersinking is
breaker Tape, Mylar.
required, use a countersink micro
stop to prevent countersinking too
(2) Fabric Layup Repair Procedure.
deep.
(a) Remove dirt, grease and aircraft luids
(m) Reinish.
from repair area as described in para-
Sand the area smooth with 180 grit
1
abrasive paper. Vacuum sanding
(b) Inspect damaged fastener hole for
dust from repair area. Wipe with
delaminations using NDI according to
clean, dry wiping cloth to remove
paragraph 5-2 and the system speciic
sanding residue.
technical manual. If delaminations are

