TM 1-1270-476-30
4-316
4-37. INDIRECT VIEW DISPLAY (IVD) ELECTRONICS ASSEMBLY 2A3 REPAIR (cont)
11. LOW VOLTAGE POWER SUPPLY
ASSEMBLY A12 REPLACEMENT
REMOVAL
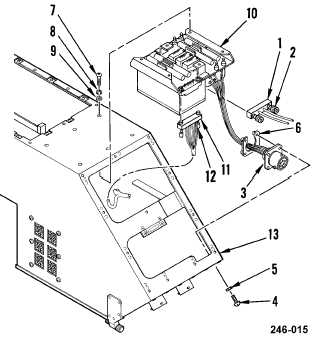
a. Remove rear assembly cover (3 above).
b. Disconnect connector P7 (1) by loosening
two screwlocks (2).
c. Remove connector J2 (3) from chassis by
removing four screws (4), washers (5), and
nut ring (6).
d. Remove six screws (7), lockwashers (8),
and washers (9), and position low voltage
power supply assembly A12 (10) to gain
access to connector J8 (11).
e. Disconnect connector P8 (11) by loosening
two screwlocks (12).
f. Remove low voltage power supply
assembly (10) from IVD (13).
INSTALLATION
g. Connect connector P8 (11) and tighten two
screwlocks (12).
h. Install low voltage power supply assembly
A12 with six screws (7), lockwashers (8),
and washers (9).
i. Install connector J2 (3) in chassis with four
screws (4), washers (5), and nut ring (6).
j. Connect connector P7 (1) and tighten two
screwlocks (2).
k. Install rear assembly cover (3 above).
END OF TASK