
0023 00
TM 1-1730-227-13&P
REMOVAL CONTINUED
3. Remove five nuts with washers (Figure 1, Item 3) securing the rim assembly (Figure 1, Item 1), tire and tube
(Figure 1, Item 4) to the hub (Figure 1, Item 2).
4.
Remove rim assembly (Figure 1, Item 1), tire and tube (Figure 1, Item 4) from the hub (Figure 1, Item 2).
INSTALLATION
1.
Position the rim assembly (Figure 1, Item 1), tire and tube (Figure 1, Item 4) on the hub (Figure 1, Item 2).
2.
Install five nuts with washers (Figure 1, Item 3) to secure the rim assembly (Figure 1, Item 1), tire and tube
(Figure 1, Item 4) to the hub (Figure 1, Item 2). Tighten nuts with washers (Figure 1, Item 3) to a torque of 540
in-lbs.
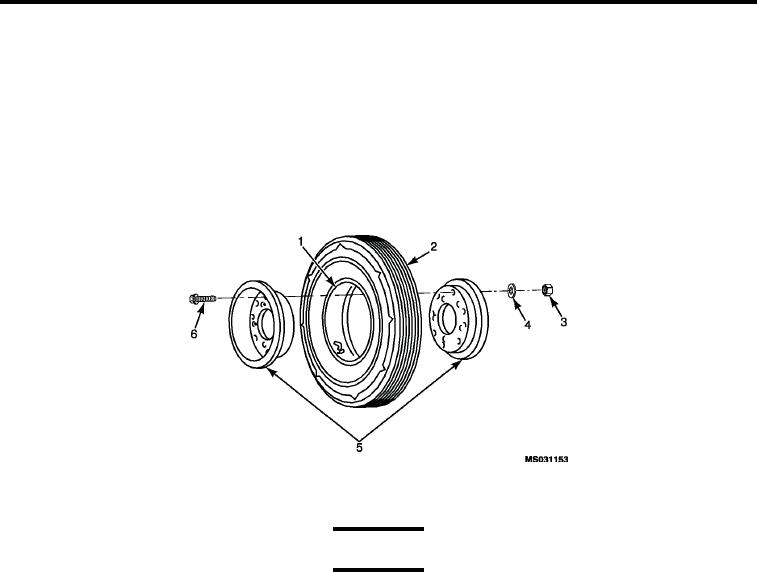
DISASSEMBLY
Figure 2.
Rim Assembly Exploded View.
WARNING
Deflate tire before loosening bolts securing rim halves. Failure to deflate tire could cause
explosive rim failure.
1.
Depress valve in valve stem to allow air to be released from tube (Figure 2, Item 1).
2.
Remove eight nuts (Figure 2, Item 3) and washers (Figure 2, Item 4) from bolts (Figure 2, Item 6) securing
both halves of the rim assembly (Figure 2, Item 5) together.
3.
Remove eight bolts (Figure 2, Item 6) and separate both halves of the rim assembly (Figure 2, Item 5) from
the tire (Figure 2, Item 2) and tube (Figure 2, Item 1), being careful not to damage the valve stem on the tube
(Figure 2, Item 1).
ASSEMBLY
1.
Position both halves of the rim assembly (Figure 2, Item 5) on the tire (Figure 2, Item 2) and tube (Figure 2,
Item 1). Align bolt (Figure 2, Item 6) holes being careful not to pinch the tube (Figure 2, Item 1) between the
rim halves (Figure 2, Item 5) or damage the valve stem.
2.
Insert eight bolts (Figure 2, Item 6) in the rim assembly (Figure 2, Item 5) and install eight washers (Figure 2,
Item 4) and eight nuts (Figure 2, Item 3). Tighten to a torque of 19 ft-lbs.
Inflate tire (Figure 2, Item 2) and tube (Figure 2, Item 1) to 65 psi.
3.
4.
Lower trailer to the ground and remove the wheel blocks.
END OF WORK PACKAGE
0023 00-2