
TM 1-1500-204-23-11
seal will have to be installed prior to vacuum integrity
testing. The backside seal is not a structural repair.
It merely ensures a vacuum seal can be obtained
in the repair area when a vacuum is drawn on the
Place vacuum port assembly at least 3 to 4
front side. This paragraph explains how to perform
inches away from the repair area to prevent
a two-side and one-side seal access repair when
wet epoxy resin from being drawn up into
performing a backside seal procedure. Repair of an
the port. Failure to do this could destroy the
area that allows access to only one side requires a
port, vacuum hose assembly, and possibly
much more involved process for backside sealing.
the vacuum pump.
(1) Two-Side Access Seal Technique. Repair
(n) Place a 4-inch square pad of loose
areas that allow access to the backside of the repair
weave breather material at each of the
require only a simple two-side access procedure to
vacuum port locations and place vac-
install the backside seal.
uum port bases on these pads.
(a) Facilities, Equipment and Material. The
(o) Fold bagging ilm over the repair part
following items are required: Scissors, Aluminum plate
and seal. Ensure the bagging ilm is
for backup plate (Local Procurement), Non-porous
supported all the way around before
release ilm, Vacuum bag sealant tape, Bagging ilm,
applying vacuum as unsupported bag-
Flashbreaker tape, Breather material, Solvent, Wiping
ging ilm can fail and result in loss of
cloth.
vacuum and possibly damage the part.
If space is not available on the part,
place the vacuum port on a tuck of bag
(b) Two Side Access Backside Seal Proce-
material. Create a large pleat of vacuum
dure. Follow these steps to perform the two side
bag material with sealant tape on both
access technique for a backside seal procedure.
sides. Place breather in the pleat so
it contacts the breather over the repair
Clean the backside of the repair area
1
patch. Install the vacuum port on the
with solvent.
pleat.
Cut a backing plate from aluminum
2
(p) Cut a small slit in the bagging ilm over
sheet stock at least 1 inch larger than
each vacuum port base and install vac-
the actual damage size. Use mate-
uum line and vacuum gauge. Use a
rial thick enough to cover the damage
sharp blade in the utility knife to pre-
and not lex when a vacuum is drawn
vent tearing the bagging ilm. Vacuum
over the repair area.
can now be applied and the cure can be
started.
Cut a piece of release ilm slightly
3
larger than the backing plate. Place
it centered over the backside of the
damage and tape into place.
Center the backing plate over the
4
separator ilm and tape into place.
Cut a piece of breather material 1 inch
5
larger than the backup plate. Center
the breather material over the backup
plate and tape into place.
Run a bead of vacuum sealant tape
6
around the perimeter of the breather
material.
Cut a piece of vacuum bagging ilm 1
7
inch larger than the vacuum sealant
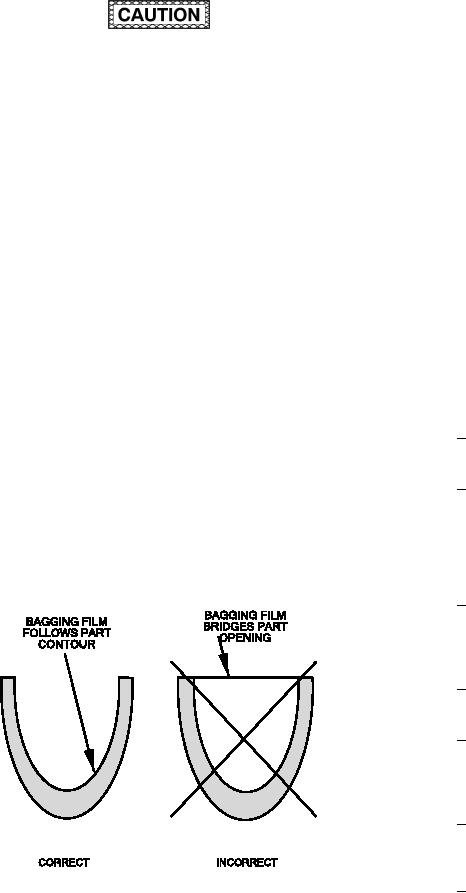
Figure 6-32. Vacuum Bag the Part Contour
tape. Install bag ilm over the back-
side seal.
e. Backside Seal Procedure. If damage com-
pletely penetrates the thickness of the skin, a backside